OAuth device code grant with Entra ID (Azure AD) and .NET
Device code grant described in RFC8628 is an extension to original OAuth 2.0 specification RFC6749.
Device code grant enables applications with limited user input or limited display capabilities to to obtain the OAuth authorization. Device code grant is commonly used on devices, which are not equipped with a keyboard or other input possibility. It can also used for applications running on browserless devices, or for environments where there is no guarantee that the browser is available. Device code grant is a perfect authorization solution for applications running on:
- IoT devices
- Smart TV’s - even if some smart tvs have the browser installed, input capabilities are often limited to the remote control.
- console - console applications can be launched in text-only environments. In such environment it is not possible to launch the system browser and perform authorization with authorization code grant or implicit flow.
- printers
Device code grant requires a secondary device, like smartphone or PC, which user can use to perform the authorization.
Table of contents
- Device Code Grant by the book
- Authorization and Authentication with device code grant
- Device code grant with Entra ID (Azure AD) and .NET
Device Code Grant by the book
Below diagram presents device code grant

First, the application performs HTTP post call to the Authorization Server’s /device_authorization endpoint. Endpoint address is not unified and can vary depends on Authorization Server provider. In the HTTP call parameters application provides its client_id (assigned in the process of client registration) and scope (representing the access application wants to be authorized to).
In response application receives
verification_uri- the uri where user should navigate to, using secondary device to perform the authorizationuser_code- the code that should be entered by user at theverification_uridevice_code- the code that identifies the authorization context; it will be used by the application to obtain the authorization status from the server and check if user already completed authorization from secondary device.expires_in- the lifetime ofdevice_codeanduser code
Next, the client application starts polling Authorization Server’s /token endpoint, by sending HTTP POST requests including
grant type: device_codedevice_code:client_id:client_secret:- in case application is confidential client, and Authorization Server issuedclient_secretin client registration process.
In the meantime user navigates to verification_uri, enters user_code and authorizes the client application.

Once authorization is given subsequent request to Authorization Server’s /token endpoint returns the access_token or id_token if device code grant was used for authentication purposes.
Authorization and Authentication with device code grant
In general, in the process of authorization, application asks the Authorization Server for specific access (scope) to some resources. This request can be approved by the user, who owns the resources or who is entitled to grant the access. Next the application obtains the access token from Authorization Server. Next the access token can be used by the application to access protected resources.
Device code grant, like other OAuth grants, be used to authenticate the application user, by utilizing Open Id Connect mechanisms. If Authorization server supports Open Id Connect it can be consider as an Identity Provider. Thanks to Open Id Connect specific scopes like openid, profile or email Identity provider can issue the id token(which represents user authentication), to the application.
Many platforms like Azure AD or Auth0 plays the role of both OAuth Authorization Server and Open Id Connect Identity Provider. They can be used by the application to obtain user’s authorization to access protected resources, but also to authenticate the application user.
Just for the naming consistency I will use the
Authorization Servername in this article, assuming that the OAuth server can act as an Open Id ConnectIdentity Provideras well.
Device code grant with Entra ID (Azure AD) and .NET
This section present how device code grant can be implemented using Entra ID (Azure AD) as the Authorization Server in .NET/C# console application.
Entra ID (Azure AD) configuration
First, application needs to be registered at the Authorization Server.
In Azure portal it can be done in Entra ID panel which can be selected form the portal or navigated directly using https://entra.microsoft.com/ or https://aad.portal.azure.com/.
New application registration can be created under App registrations blade.
After selecting + New registration option some initial application configuration is required
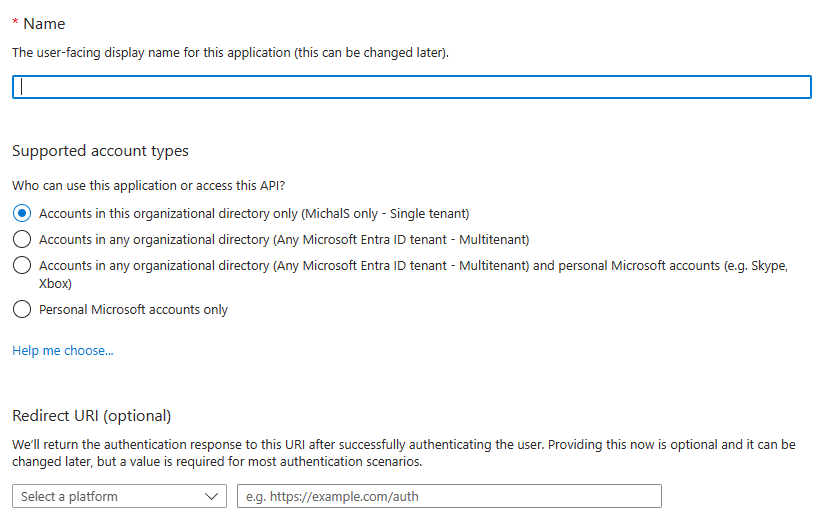
At this point application name and type of accounts that will be allowed to use perform authorization/authentication for application needs to be specified. Redirect uri can be left empty, since device code grant does not utilize any redirect uri.
Public client
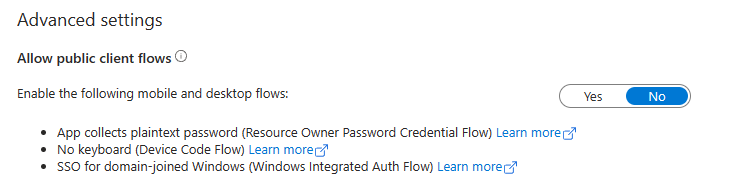
Most applications that utilizes device code grant can be considered as public clients. In general public clients are unable to securely store any secret (like client_secret). Console applications, running in the users system, or Smart TV environment, are the examples of public clients. In Entra ID it is required to enable the support for public clients in created registration.
Navigate to application registration and open Authentication blade. Scroll to the bottom and toggle Enable the following mobile and desktop flows: option to Yes.
Confidential client
In general device code grant, as per its specification, can be used for both
- public clients- with only
client_idprovided to identify the client to the Authorization Server’s\tokenendpoint - confidential clients- with
client_idandclient_secretprovided to identify and authenticate the client to the Authorization Server’s\tokenendpoint.
Entra ID does not provide dedicated device code grant handling for confidential clients. Even if registered application is confidential, it is required to enable allow public client flows option to use device code grant. Otherwise following error will be returned from /token endpoint (even if the request body contains valid client_secret).
"error": "invalid_client",
"error_description": "AADSTS7000218: The request body must contain the following parameter: 'client_assertion' or 'client_secret'. Trace ID: Correlation ID:  Timestamp:",
"error_codes": [
    7000218
],
Once allow public client flows option is set, client_secret provided to the \token endpoint is not validated by Entra ID.
.NET application
In this section I will demonstrate how to authenticate .NET console application user.
The application is not designed to perform all http calls described in first paragraph by itself. Thankfully Microsoft developed Microsoft.Identity.Client nuget package which makes all http calls under the hood.
First, we create the appsettings.json configuration file in under the project. The configuration includes data, which Entra ID requires to identify the tenant where the application is registered and the application itself.
//appsettings.json
{
  "AzureAd": {
    "TenantId": "YOUR_TENANT_ID",
    "ClientId": "YOUR_APPLICATION_ID"
  }
}
Now, the configuration can be used to instantiate Microsoft.Identity.Client PublicClientApplication object which implements the methods to call Entra ID API.
The application is created with .NET 6
//Program.cs
using Microsoft.Extensions.Configuration;
using Microsoft.Extensions.DependencyInjection;
using Microsoft.Extensions.Hosting;
using Microsoft.Identity.Client;

using IHost host = Host.CreateApplicationBuilder(args).Build();
IConfiguration config = host.Services.GetRequiredService<IConfiguration>();

var publicClientApplicationOptions = config.GetSection("AzureAd")
    .Get<PublicClientApplicationOptions>();

var publicClient = PublicClientApplicationBuilder
    .CreateWithApplicationOptions(publicClientApplicationOptions)
    .Build();

var result = await publicClient.AcquireTokenWithDeviceCode(Enumerable.Empty<string>(), deviceCodeCallback =>
{
    Console.WriteLine(deviceCodeCallback.Message);
    return Task.FromResult(0);
}).ExecuteAsync().ConfigureAwait(false);

Console.WriteLine($"You successfully are logged in as {result.Account.Username}");

await host.StartAsync();
AcquireTokenWithDeviceCode function does all the magic. I takes two arguments.
IEnumerable<string> scopes- collection of scopes, which represent accesses the application wants to be authorized for. Following OpenId scopes are included even if they are not specified explicitly:offline_accessprofileopenid
Func<DeviceCodeResult, Task> deviceCodeResultCallback- callback, which implements the logic of instructing the user on how to perform the authorization/authentication using device code grant.DeviceCodeResultobject passed as callback input contains all properties received from Entra ID/deviceendpoint, likedevice_code,user_codeorverification_uri. The callback logic should use this properties to instruct the user to navigate to theverification_uriand ender theuser_code.DeviceCodeResultobject contains theMessageproperty. It is ready to use string with an instruction, which can be displayed to the user (like in the example code).
Microsoft.Identity.Client project can be found at github. https://github.com/AzureAD/microsoft-authentication-library-for-dotnet