Blazor WASM: OAuth authorization to WebAPI with Azure B2C
This article shows how to enable blazor web assembly application, to obtain the authorization to access web API with Azure AD B2C.
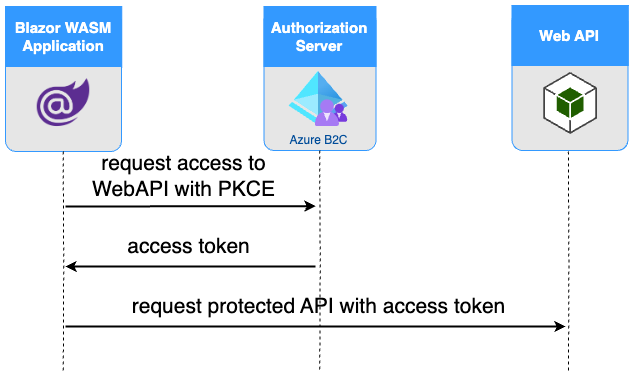
Authorization process presented in this article is based on OAuth framework. Basic understanding of OAuth should be considered as prerequisite for reading this article. If you are not familiar with OAuth concepts, read my previous article.
In scope of this article we will:
- create and set up blazor WASM and Web API applications
- configure app registrations in Azure AD B2C. (Both blazor application and web API application needs to be represented in Azure AD B2C by app registration)
Table of Contents
- Setting up blazor WASM
- Setting up WebAPI
- Blazor application obtains authorization to the Web API
- Testing
Setting up blazor WASM
Creating Azure AD B2C app registration
Let’s start with creating Azure AD B2C app registration for blazor WASM application, follow the process described in: https://learn.microsoft.com/en-us/azure/active-directory-b2c/tutorial-register-applications#app-registrations
Setting up demo application
The command below creates blazor WASM application project, pre-configured with Azure AD B2C as the authorization server (and as the identity provider).
Before executing the command fill the placeholders with your tenant and application data.
dotnet new blazorwasm --auth IndividualB2C --aad-b2c-instance AAD-B2C-INSTANCE --domain DOMAIN --susi-policy-id SUSI-POLICY --client-id CLIENT-ID --name blazorWASM-application
| Command placeholder | Description |
|---|---|
AAD-B2C-INSTANCE |
Url to the Azure B2C instance - https://TENANT_NAME.b2clogin.com/ |
DOMAIN |
Domain name can be found in Azure Portal in Azure AD B2C Overview blade |
SUSI-POLICY |
Name of the user flow used to log in/out users. Flow can be created in Azure AD B2C User Flows Blade. See user flows documentation for reference. |
CLIENT-ID |
Client id of blazor app registration can be found in corresponding app registration’s Overview blade |
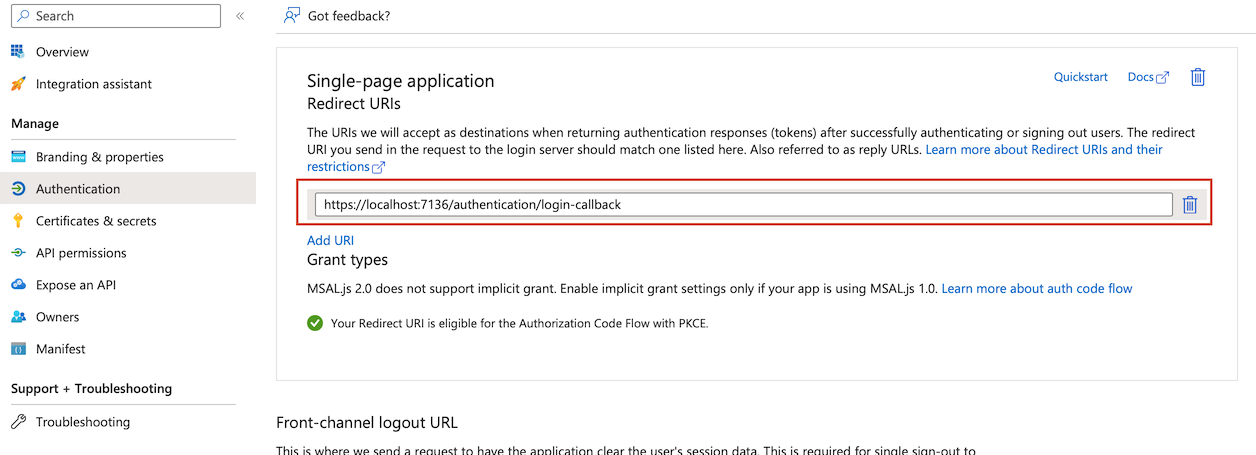
By default, created project is running on localhost’s random port. Check the port number in launchSettings.json file created under /Properties directory, add https://localhost:PORT/authentication/login-callback redirect uri to in blazor app registration’s Authentication blade.
Testing the application
Now let’s run the application and try to log in.
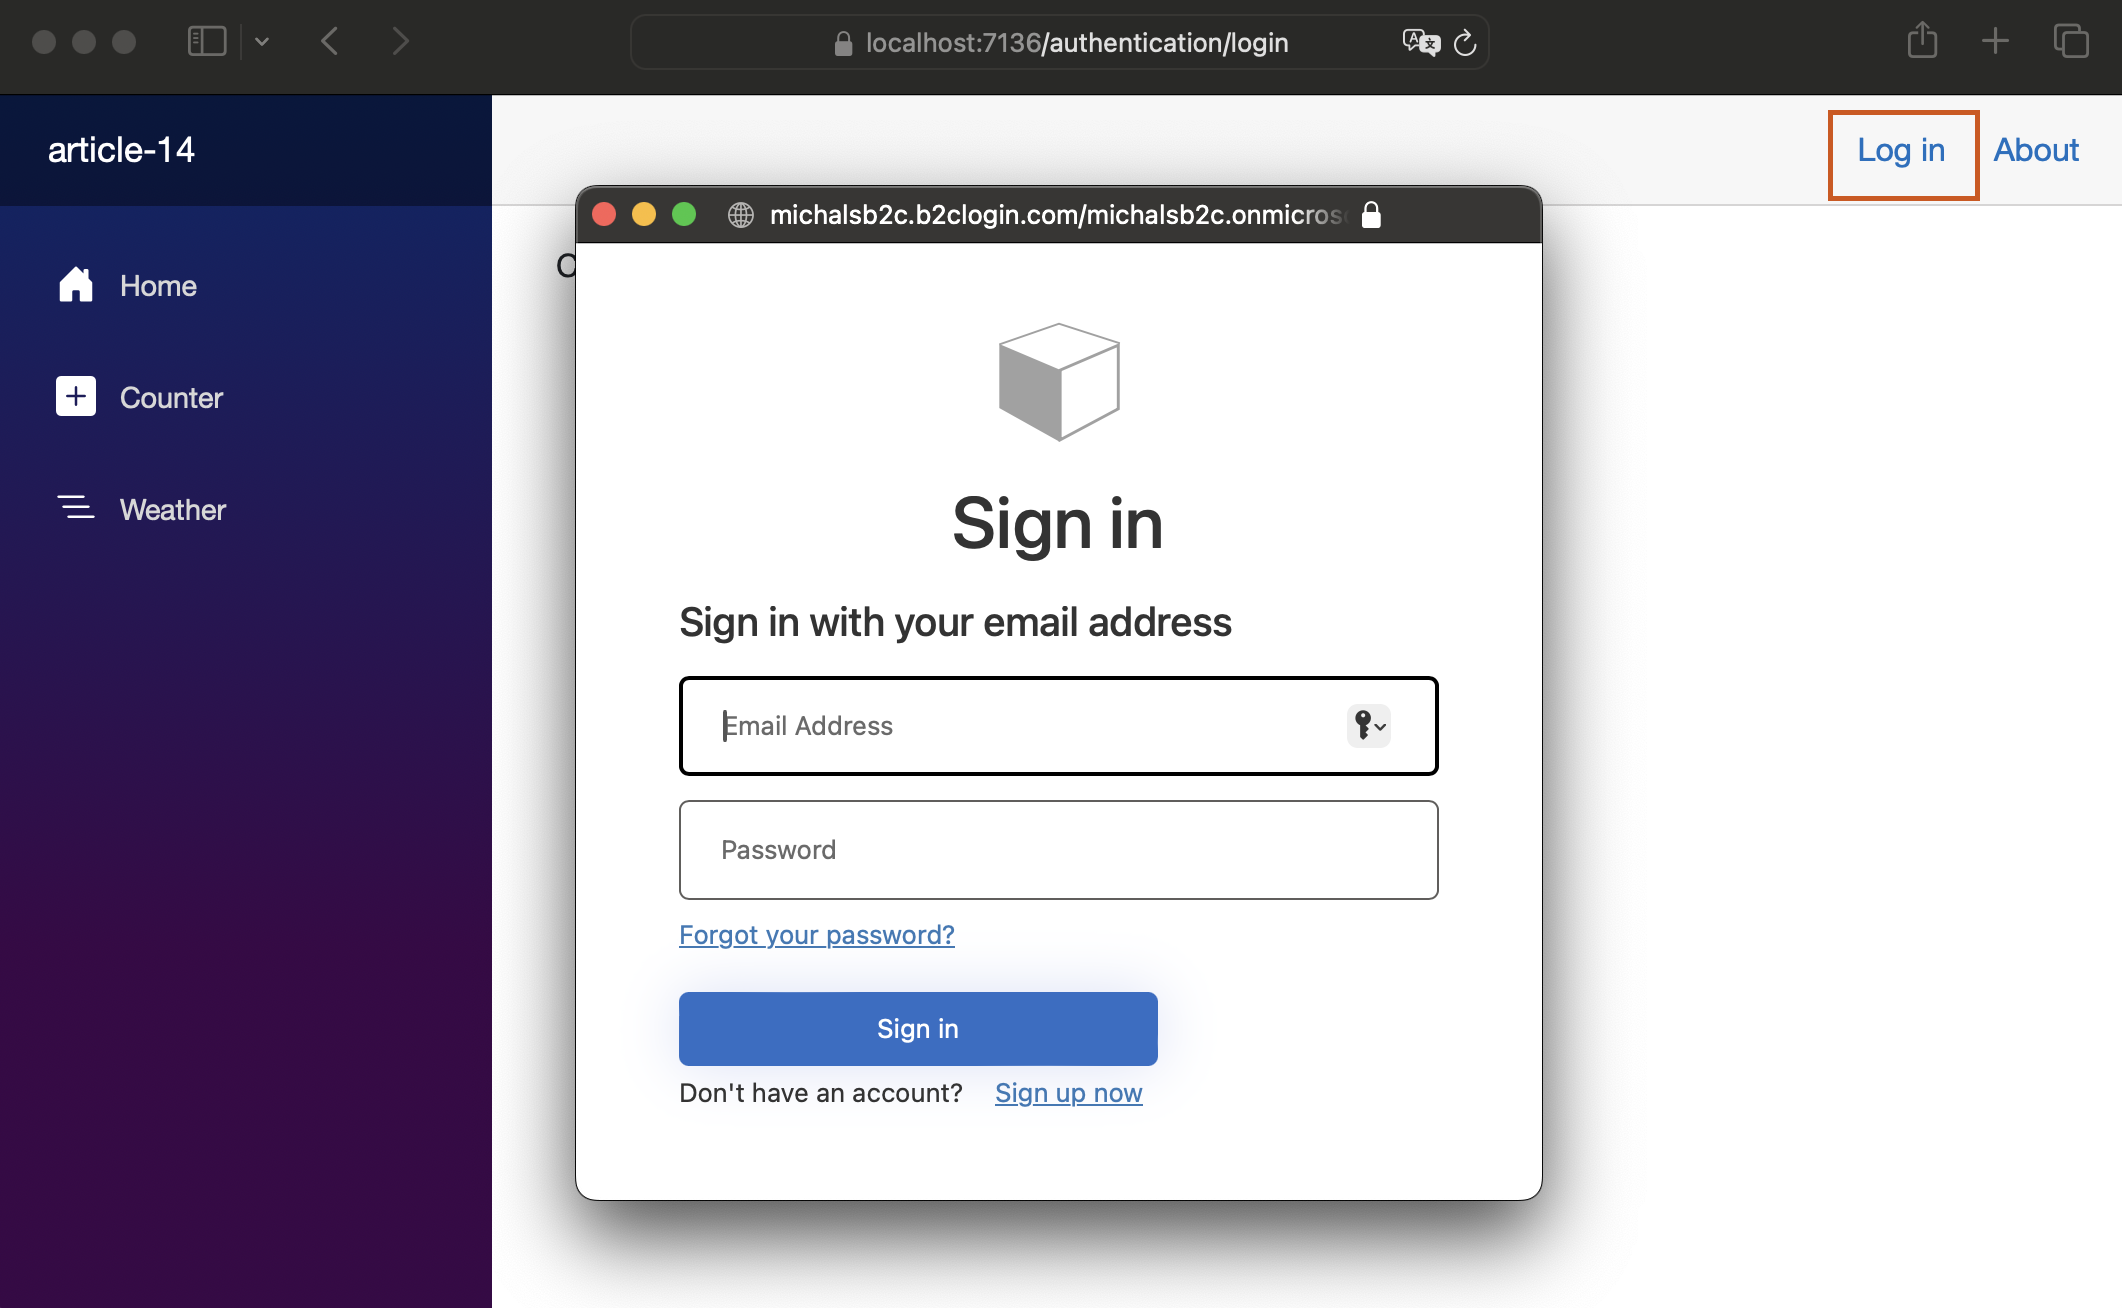
In the process of logging in, Azure AD B2C issues an id token, which includes user-related data, for blazor application.
Setting up WebAPI
Creating Azure AD B2C app registration
The process of creating Azure AD B2C app registration for web API application is well described in microsoft documentation. Follow the first paragraph of Add a web API application to your Azure Active Directory B2C tenant.
Configure scopes paragraph explains how to create scopes for web application. Scopes can be considered as granular access levels. External applications can access protected Web API endpoints, only if the required scope (access level) is included in the access token, provided within the request to Web API. Once steps from this paragraph are completed demo.read and demo.write scopes are configured for Web API application. We will use these scopes to protect WebAPI endpoints in a second.
Grant permissions paragraph shows how to grant blazor application permissions to demo.read and demo.write scopes. Once steps from this paragraph are completed, blazor application user’s are able to obtain the authorization to Web API protected endpoints which require demo.read and demo.write scopes.
Setting up demo application
Now, let’s create Web API application. Again, we will use dotnet cli to pre-configure web api with Azure AD B2C settings. Fill the placeholders with your tenant and application data, before executing the command,
dotnet new webapi --auth IndividualB2C --aad-b2c-instance AAD-B2C-INSTANCE --domain DOMAIN --susi-policy-id SUSI-POLICY --client-id WEB-API-CLIENT-ID --default-scope demo.read
| Command placeholder | Description |
|---|---|
AAD-B2C-INSTANCE |
Url to the Azure B2C instance - https://TENANT_NAME.b2clogin.com/ |
DOMAIN |
Domain name can be found in Azure Portal in Azure AD B2C Overview blade |
SUSI-POLICY |
Name of the user flow used to log in/out users. Flow can be created in Azure AD B2C User Flows Blade. See user flows documentation for reference. Make sure entered user flow name is correct. Otherwise you can expect Bearer error="invalid_token", error_description="The issuer '(null)' is invalid" error later. |
CLIENT-ID |
Client id of blazor app registration can be found in corresponding app registration’s Overview blade . Make sure client id belongs to the Web API app registration. Otherwise you can expect Bearer error="invalid_token", error_description="The audience 'client_id' error later. |
The dotnet cli command creates OAuth enabled Web API, pre-configured with your Azure AD B2C tenant settings. Web API contains single /weatherforecast endpoint, which requires data.read scope to be present in the access token (provided as an Authorization header within the endpoint request).
Before running Web API project, there are two required adjustments:
1. CORS Policy
By default WebAPI server implements same-origin CORS policy. It means, Web API can only accept traffic from the domain it is hosted on. It prevents other (potentially malicious) applications from getting responses from Web API. To enable blazor application to get responses from Web API, policy must be loosened a little. Navigate to Program.cs and add following code.
var  MyAllowSpecificOrigins = "_myAllowSpecificOrigins";
builder.Services.AddCors(options =>
{
    options.AddPolicy(name: MyAllowSpecificOrigins,
        policy  =>
        {
            policy.WithHeaders(["Authorization"]);
            policy.WithOrigins(["https://localhost:PORT"]); //replace PORT with the localhost port on which blazor app is running.
        });
});
//...
app.UseCors(MyAllowSpecificOrigins);
2. Fix template generator bug
dotnet cli generator generated following line in Program.cs
var scopeRequiredByApi = app.Configuration["AzureAd:Scopes"] ?? "";
Replace it with
var scopeRequiredByApi = app.Configuration["AzureAdB2C:Scopes"] ?? "";
it is required, since the appSettings.json section related with Azure AD B2C settings is named AzureAdB2C.
Blazor application obtains authorization to the Web API
Now, let’s focus on how to enable blazor application to obtain the access token from Azure AD B2C, and use it to request data from Web API /weatherforecast endpoint.
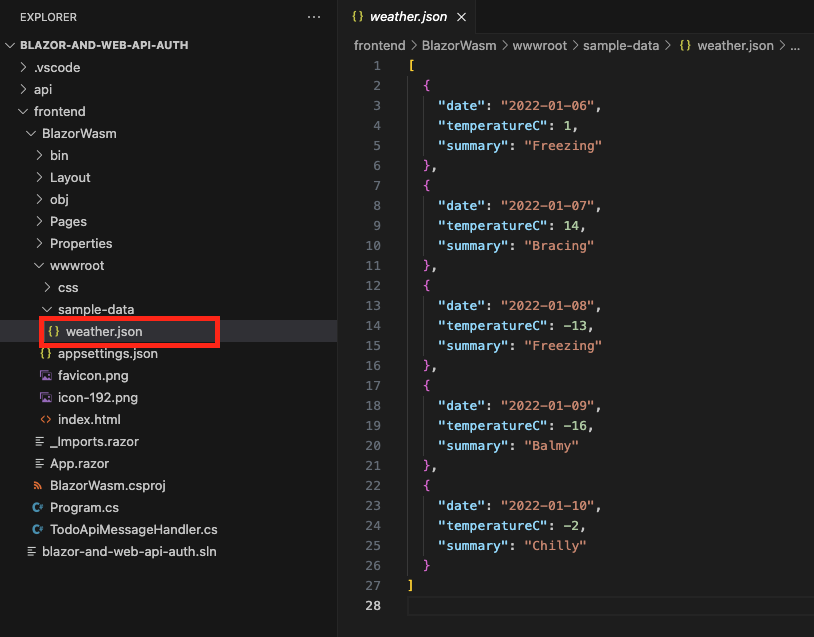
Blazor application created by dotnet cli command has the Weather tab already in place.
By default its content is filled with the static json data hosted within the blazor application.
Blazor application uses HttpClient, to request the json data from its own domain
//Program.cs
//...
builder.Services.AddScoped(sp => new HttpClient { BaseAddress = new Uri(builder.HostEnvironment.BaseAddress) });
HttpClient that obtains access token
We need to replace the HttpClient registration with the HttpClient configured with Web API uri and able to obtain the authorization from Azure AD B2C. HttpClient class has a constructor which takes HttpMessageHandler as an argument. HttpMessageHandler is an abstract class containing Send and SendAsync methods. By implementing these, it is possible to add an extra logic before HttpClient sends the HTTP request. The extra logic can be used to obtain the access token from Azure AD B2C and attach it in the request’s Authorization header.
Fortunately, we don’t need to implement this logic by ourselves. ASP.NET Core contains AuthorizationMessageHandler class, which inherits from HttpMessageHandler, and provides an implementation, which obtains the access token from Azure AD B2C, and attaches it in the request’s Authorization header.
AuthorizationMessageHandler can be initialized in the following way:
//Program.cs
//...
builder.Services.AddScoped(sp => new HttpClient(sp.GetRequiredService<AuthorizationMessageHandler>()
.ConfigureHandler(
    authorizedUrls: new[] { "https://localhost:PORT/weatherforecast" },  //replace PORT with the localhost port on where Web API is running.
    scopes: new[] { "DEMO-READ-SCOPE" } // replace DEMO-READ-SCOPE with full scope name.
))
{
    BaseAddress = new Uri("https://localhost:PORT/") //replace PORT with the localhost port on where Web API is running.
});
AuthorizationMessageHandler needs to be configured with
- authorizedUrls - urls which require authorization, access token will be attached to request to endpoints specified in this parameter
- scopes - the scope that is required, by the endpoints specified in authorizedUrls parameter. Before sending request to these endpoints,
AuthorizationMessageHandlerwill try to obtain the access token with given scopes. Note that full scope name needs to be passed in this parameter. It can be copied from Expose an API blade in the Web API app registration.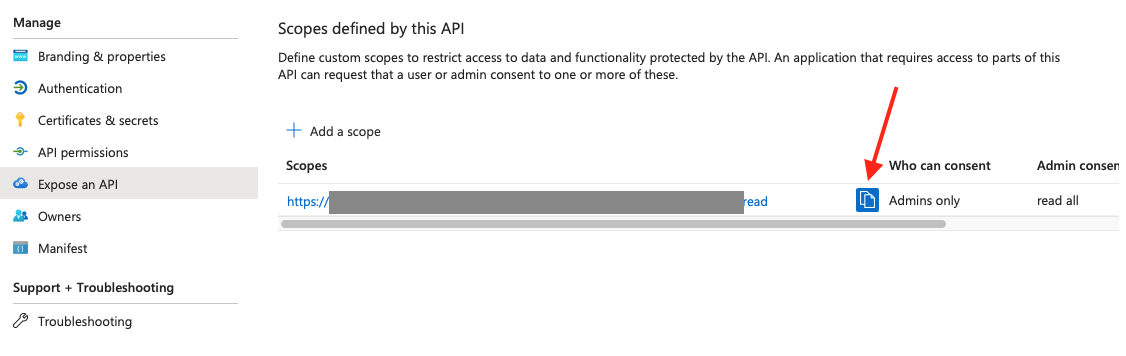
In case of System.InvalidOperationException: The inner handler has not been assigned.
If the code causes System.InvalidOperationException: The inner handler has not been assigned. exception, it means the dotnet bug reported in github.com/dotnet/aspnetcore/issues/38486 is not fixed by the time you are reading this article. To fix the error, it is required to create a custom class, which inherits from AuthorizationMessageHandler and sets the inner handler. For instance:
//WeatherMessageHandler.cs
using Microsoft.AspNetCore.Components;
using Microsoft.AspNetCore.Components.WebAssembly.Authentication;

namespace BlazorWasm;

public class WeatherMessageHandler : AuthorizationMessageHandler
{
    public WeatherMessageHandler(IAccessTokenProvider provider, NavigationManager navigation) : base(provider, navigation)
    {
        ConfigureHandler(
            authorizedUrls: new[] { "https://localhost:7022/PORT" }, //replace PORT with the localhost port on where Web API is running.
            scopes: new[] { "DEMO-READ-SCOPE" } // replace DEMO-READ-SCOPE with full scope name.
        InnerHandler = new HttpClientHandler(); //missing inner handler assignment
    }
}
Now, WeatherMessageHandler can be used to instantiate HttpClient in Program.cs
builder.Services.AddScoped(sp => new HttpClient(sp.GetRequiredService<WeatherMessageHandler>())
{
    BaseAddress = new Uri("https://localhost:7022/") //replace PORT with the localhost port on where Web API is running.
});
AuthorizationMessageHandler accesses API
As it was already mentioned Weather’s page content is filled with the static json data hosted within the blazor application. Code below presents how HttpClient is used to request json data.
// Pages/Weather.razor
@page "/weather"
@inject HttpClient Http
//...
protected override async Task OnInitializedAsync()
{
    forecasts = await Http.GetFromJsonAsync<WeatherForecast[]>("sample-data/weather.json");
}
//..
We have already changed the HttpClient registration, so injected HttpClient is now able to obtain the access token and attach it to HTTP request each time before it is sent to Web API.
Adjust above code the so it gets the data from proper Web API endpoint. Change OnInitializedAsync method as follows:
try
{
    forecasts = await Http.GetFromJsonAsync<WeatherForecast[]>("weatherforecast");
}
catch (Microsoft.AspNetCore.Components.WebAssembly.Authentication.AccessTokenNotAvailableException ex)
{
    ex.Redirect();
}
AccessTokenNotAvailableException is thrown when HttpClient is unable to obtain the access token. It can be caused by missing or expired user session. (If you are interested in user session topic I have already write an article covering this topc). When AccessTokenNotAvailableException is thrown, by calling AccessTokenNotAvailableException.Redirect() function, user is redirected to Azure AD B2C authorization endpoint for authentication.
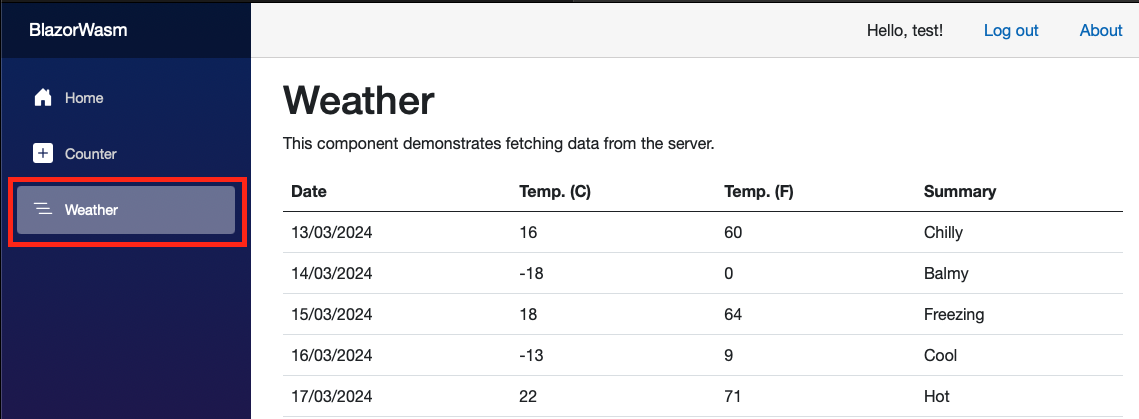
Testing
Run both Web API and blazor WSM applications and try to navigate to Weather tab.